Local Tactics in Tumbleweed #
69 puzzles and explanations designed, written and compiled by a few people from the Tumbleweed community: test654, atari, shinuito, hootie, and spartacu5
Introduction #
Welcome to our collection of Local Tactics in Tumbleweed. Here we present 69 puzzles that together, when understood thoroughly, make up the fundamental basis of tactical knowledge in the game of Tumbleweed.
In these puzzles, it is always Red to play. We present sets of 1-4 puzzles at a time, with explanations and solutions immediately following each set.
Puzzles are arranged in two main sections: “Red to live”, followed by “Red to win”. Within each section, puzzles are somewhat organized by difficulty level. If the reader encounters a puzzle that is too difficult, they are encouraged to move on to the next set, or the next main section.
Most of these problems have unique solutions (symmetry notwithstanding). Some puzzles feature blank stacks: treat these blank stacks as 6-stacks, uncapturable.
Enjoy!
Helpful terms #
- Size/Height: The number on the stack.
- LOS: line of sight
- eLOS: enemy line of sight
- fLOS: friendly line of sight
- Capture: Replace an enemy stack with a bigger stack of your own.
- Reinforce: Replace a friendly stack with a bigger stack.
- Live: Own at least one uncapturable stack.
- Suicidal move: placing a stack on a cell controlled by the opponent.
- Snapback: an immediate recapture or a forcible, delayed recapture.
- Parry/Oversee: increase fLOS to exceed eLOS on an attacked friendly stack.
- Shield: placement in between an attacked friendly stack and enemy stack.
- Cap: stack on the end of a linear group which ensures life of that group.
- Anchor: an (often) sacrificial move meant to temporarily increase fLOS
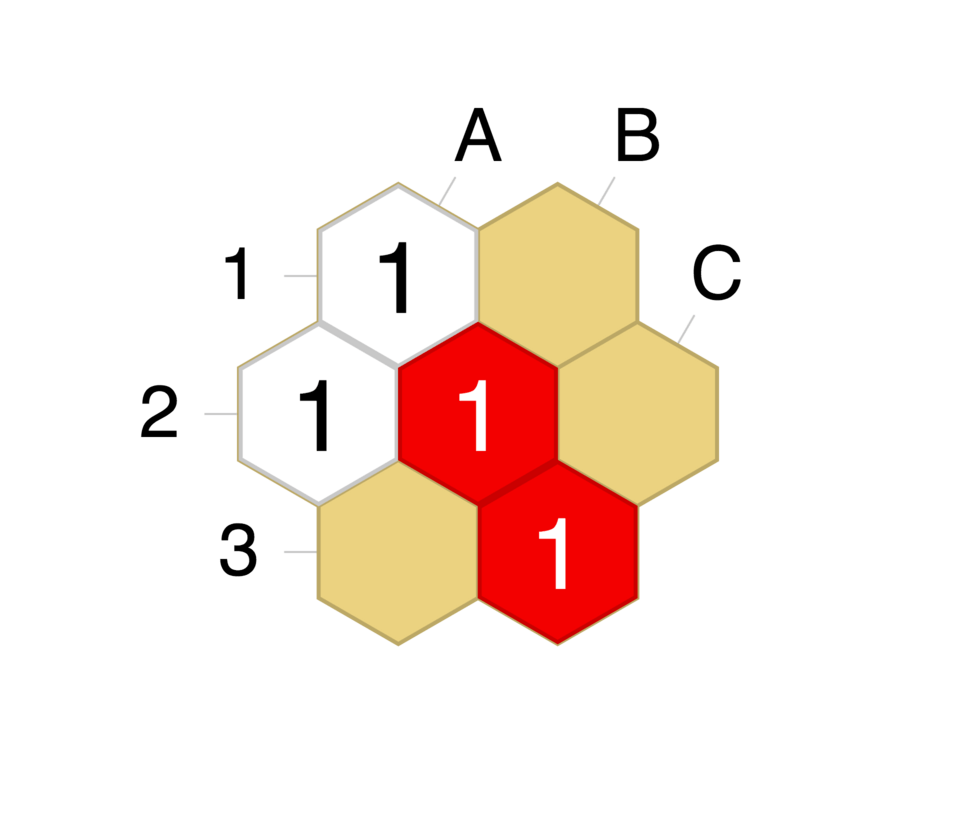
Puzzle 1: red to capture #
Author: shinuito Difficulty: very easy

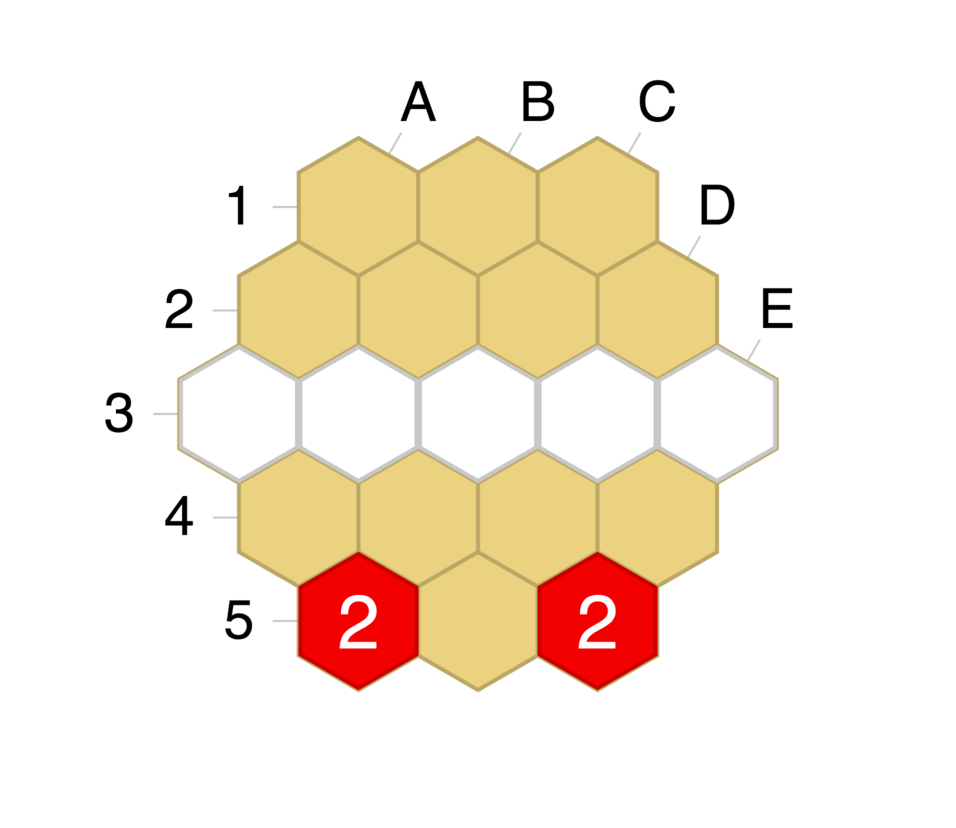
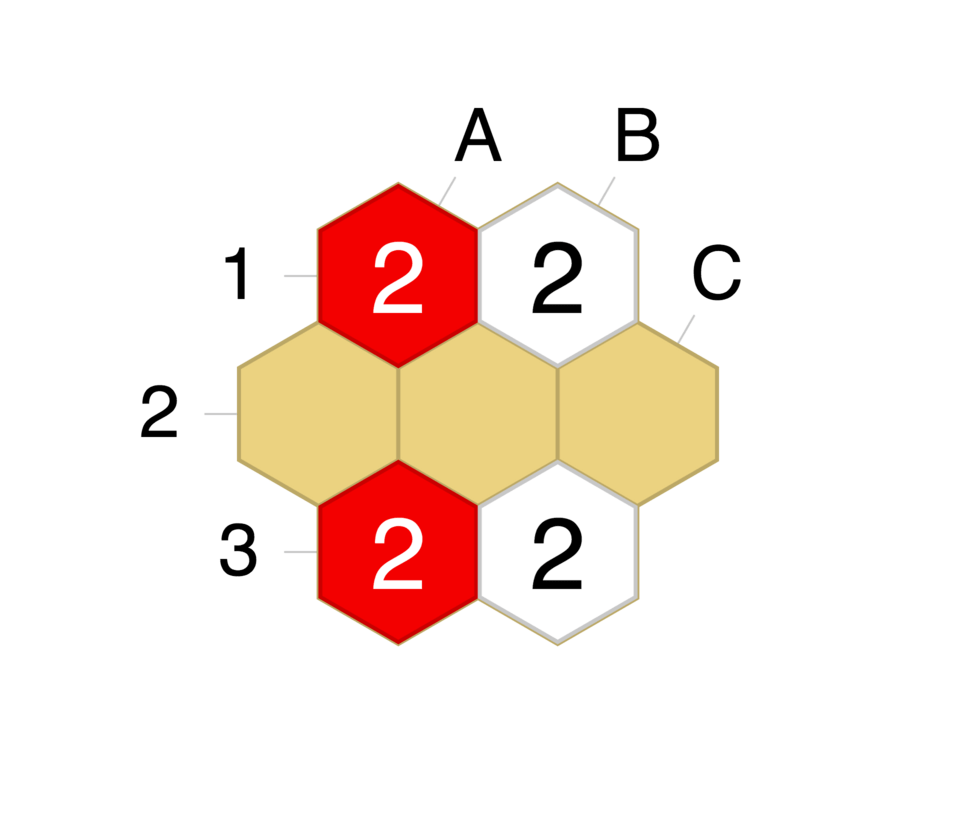
Puzzle 2: red to live #
Author: shinuito Difficulty: very easy
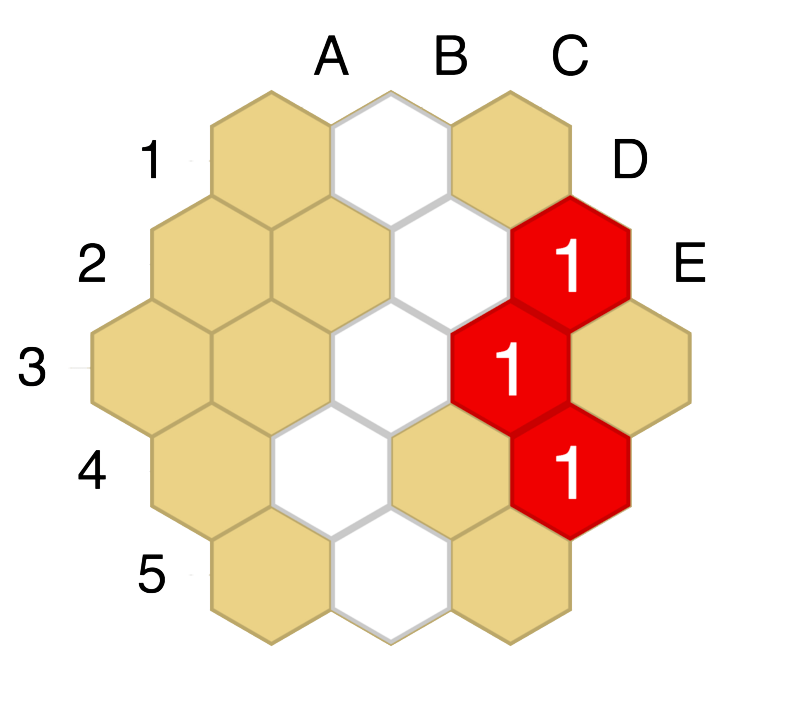
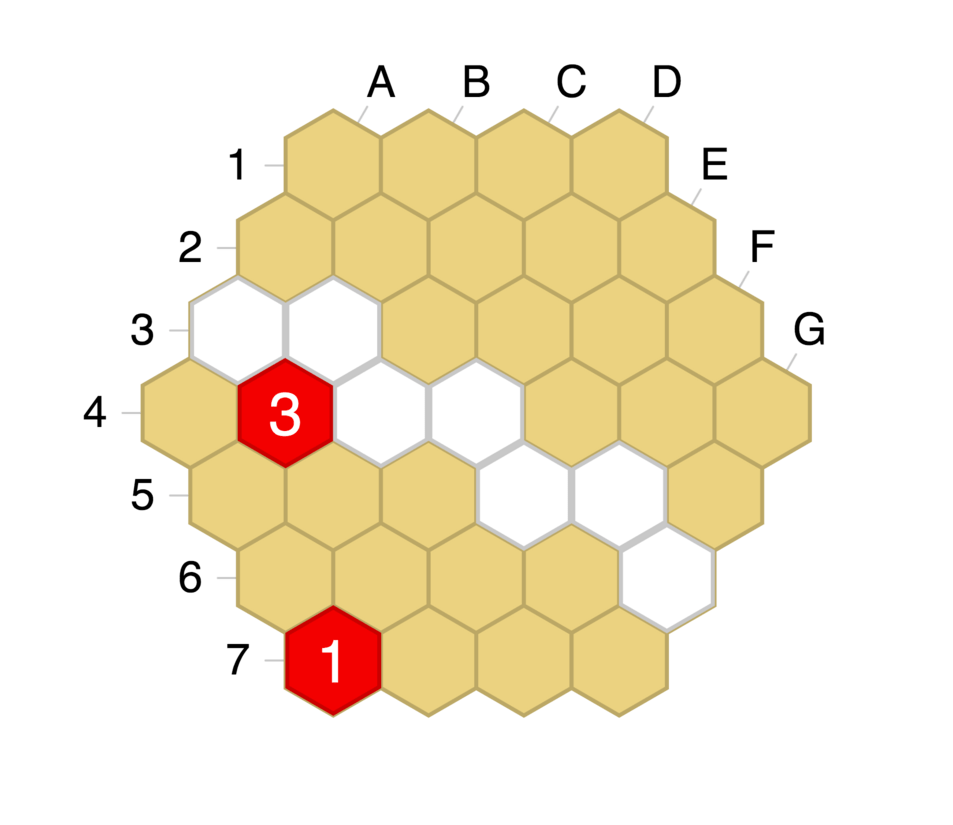
Puzzle 3: red to live #
Author: shinuito Difficulty: very easy
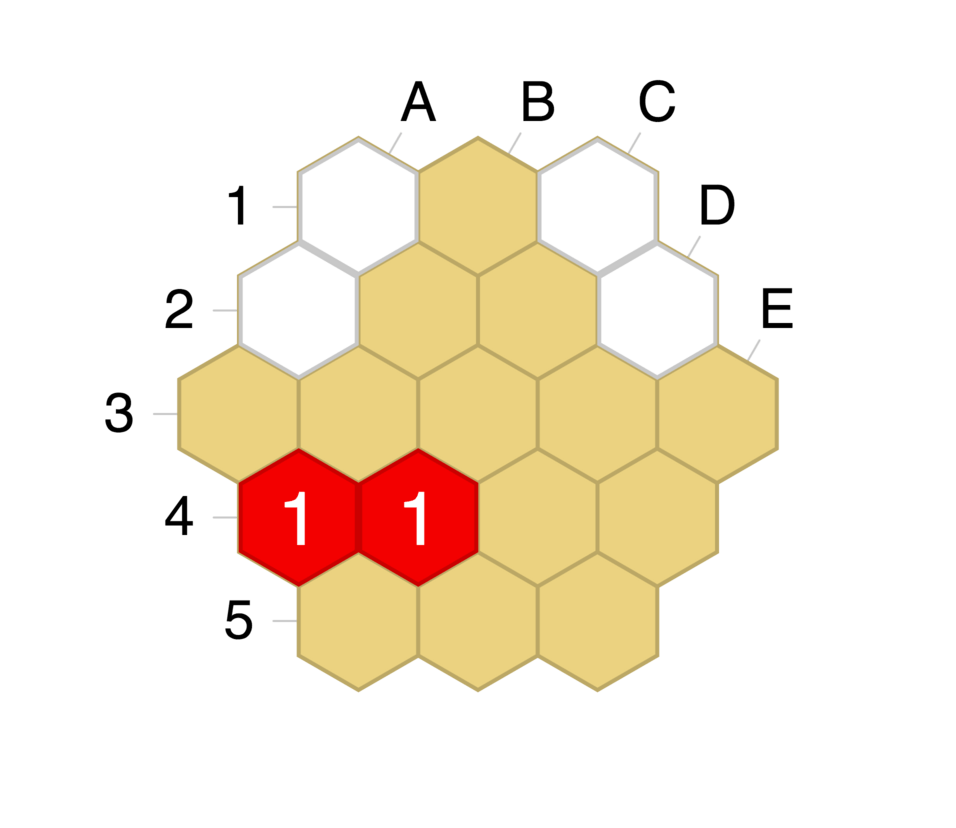
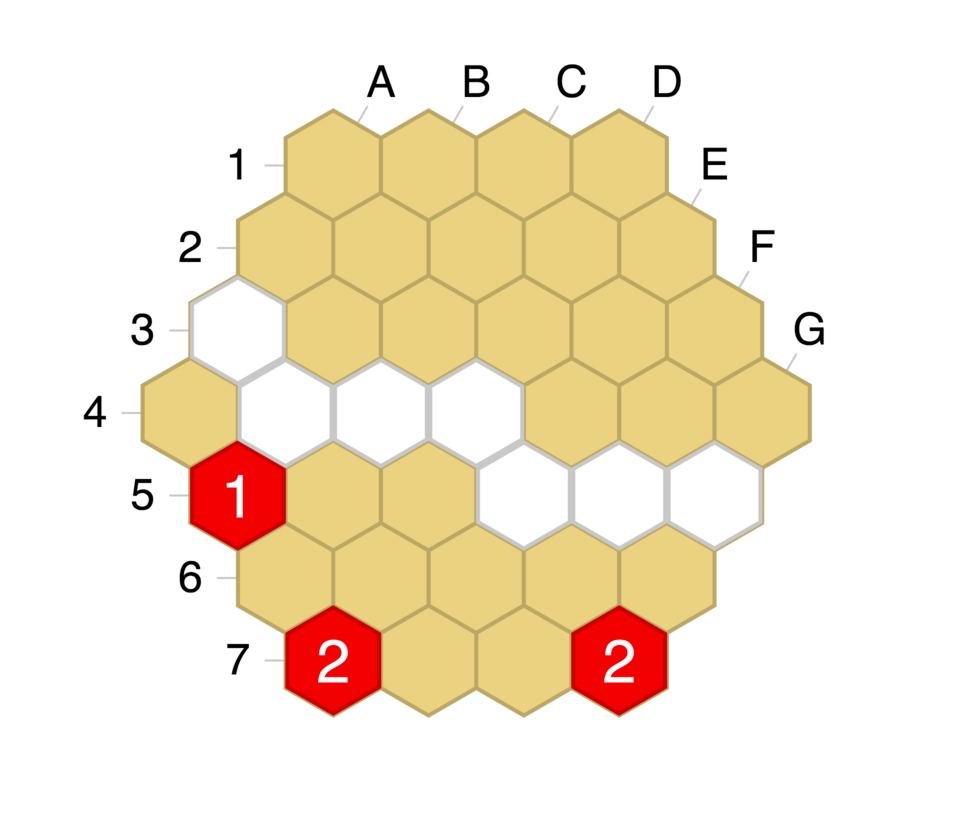
Puzzle 4: red to live #
Author: shinuito Difficulty: very easy

Solutions for Puzzle 1 to 4 #
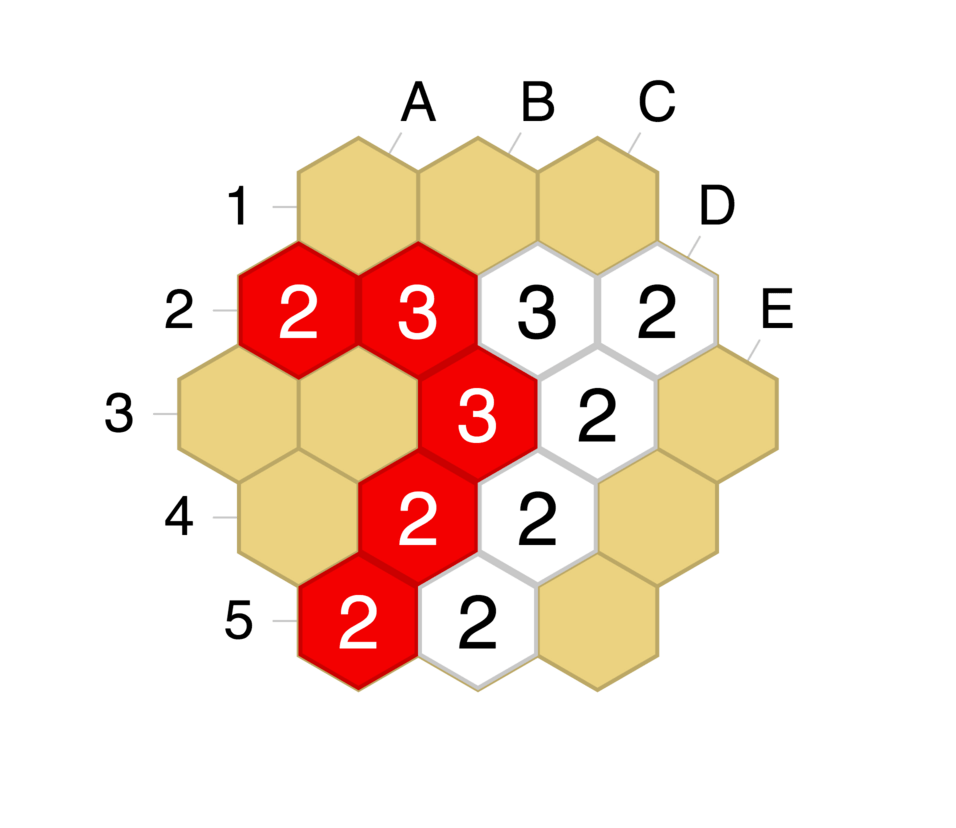
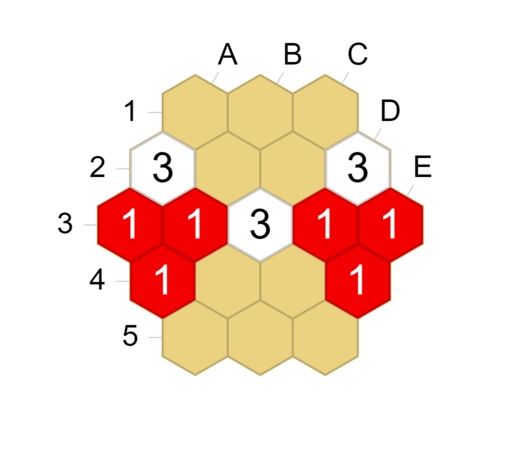
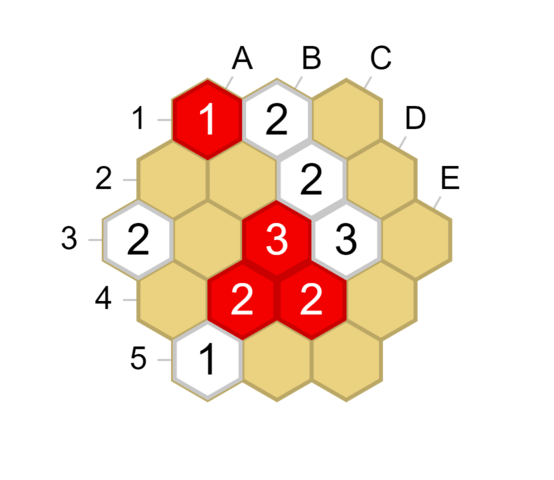
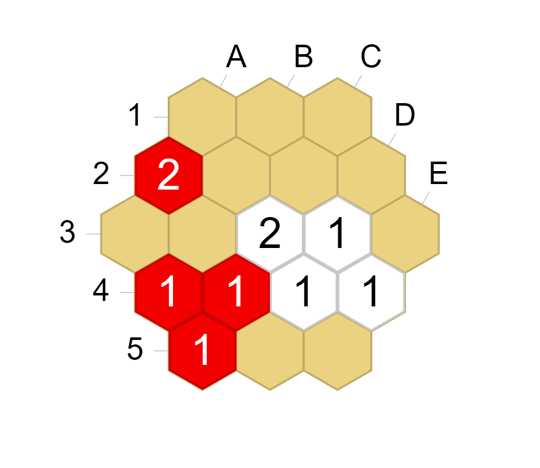
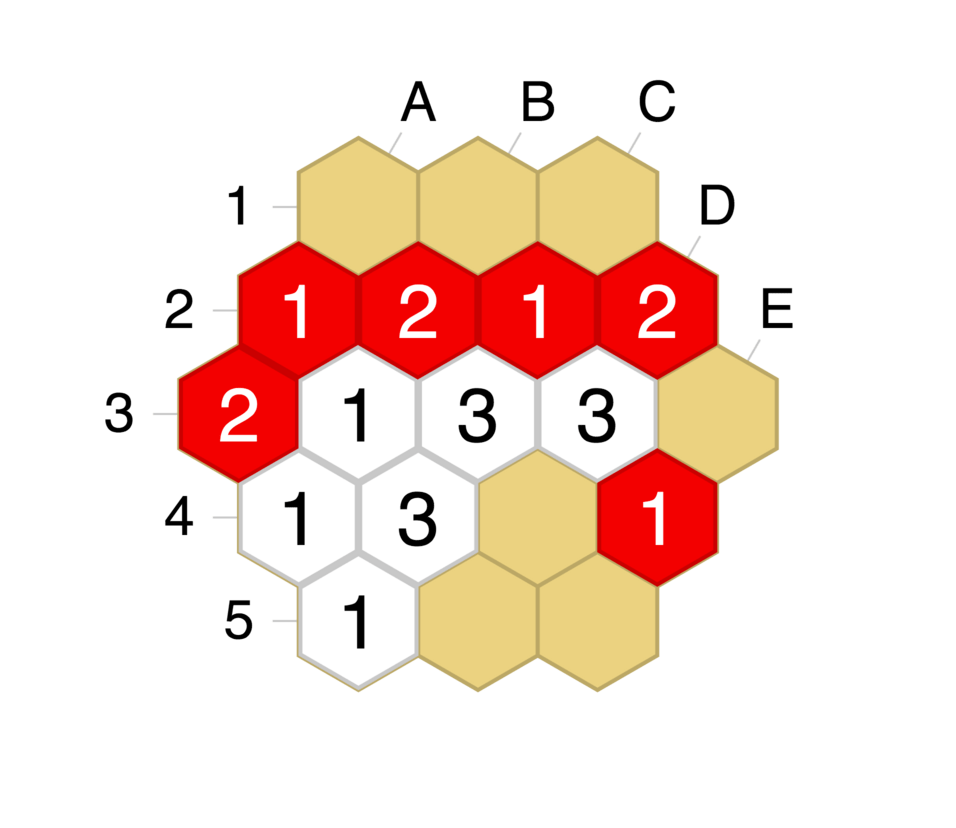
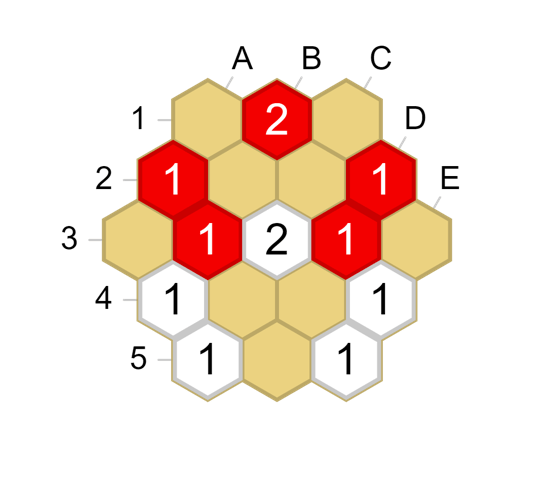
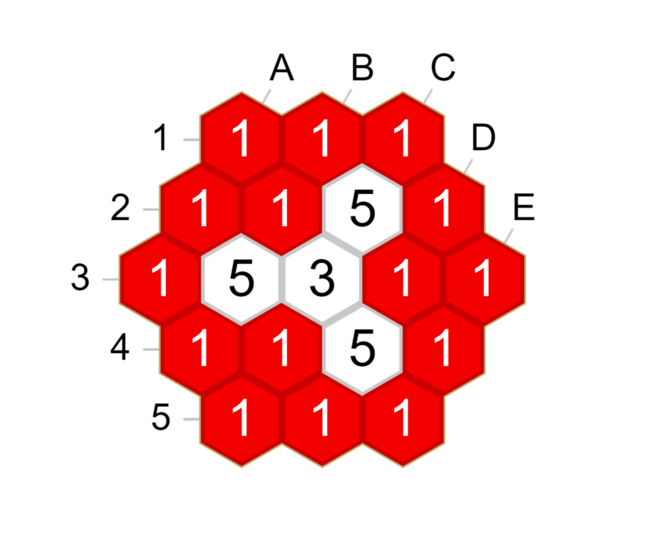
Puzzle 1: The puzzle asks you to “capture”. This means you should replace an enemy stack with your own. In order to replace any stack in some cell, you need to be able to make a bigger stack – e.g. you must have more lines of sight (LOS) than the size (height) of the stack already in that cell. Here, Red can play 1. C3x is where red has 2 lines of sight on white’s 1-stack.
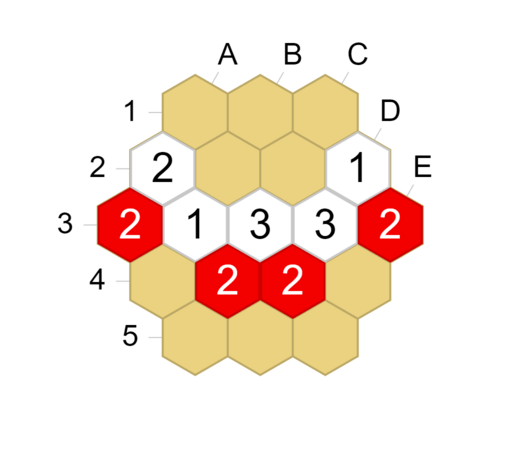
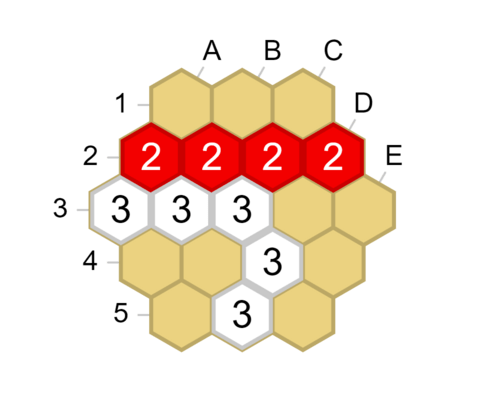
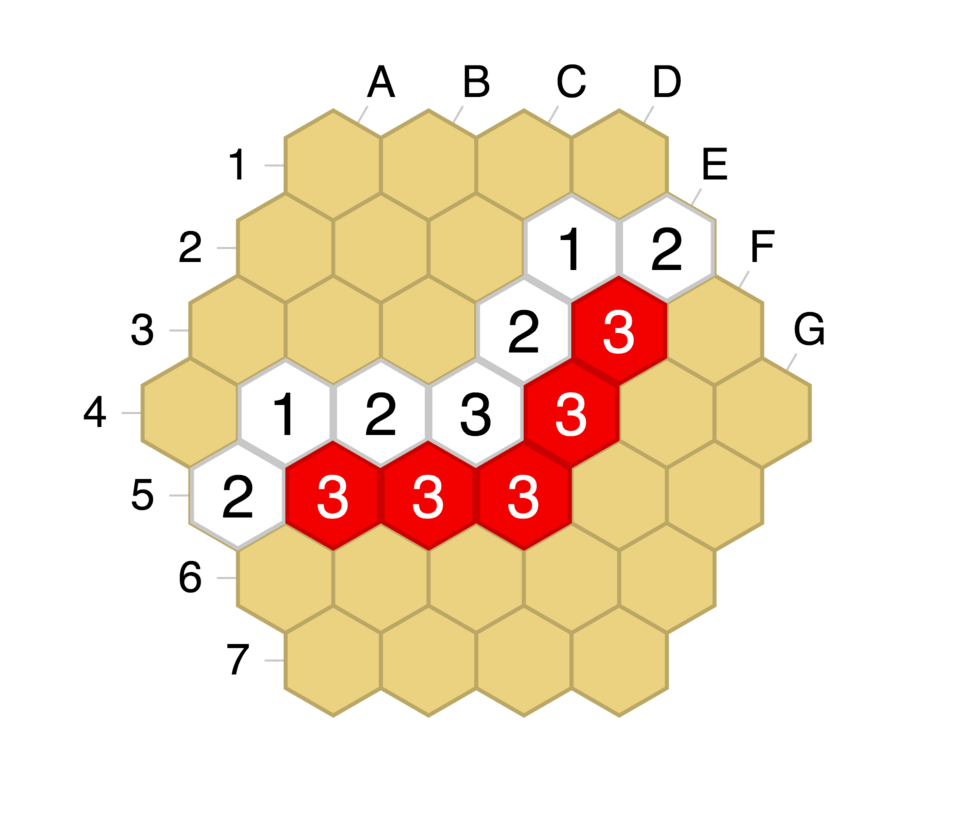
Puzzle 2: To ”live” means to create at least one safe or immortal stack, such that the opponent could never capture it. In other words, you must create a position where enemy lines of sight (eLOS) could never exceed the size of at least one of your stacks. In this position, the only move for Red is 1. D5 and red would then have a board-spanning wall of 2-stacks on the edge. Such a wall is always alive, because the eLOS on it cannot exceed 2.
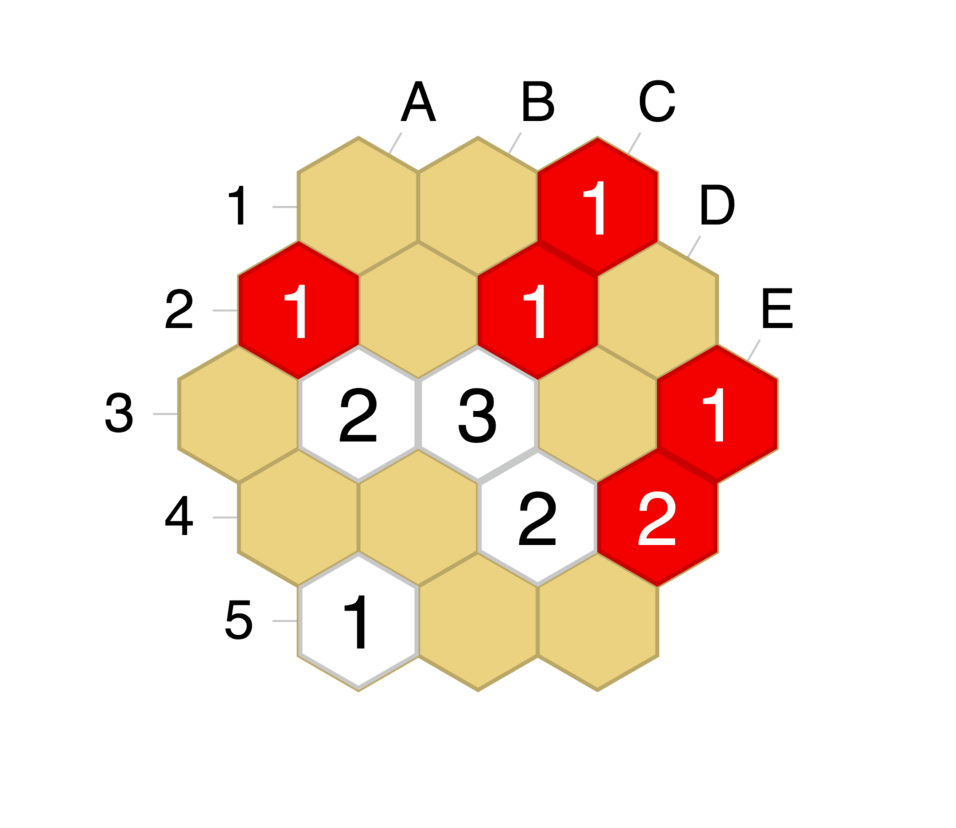
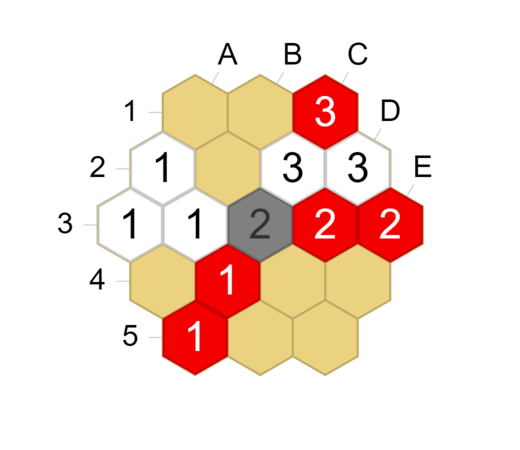
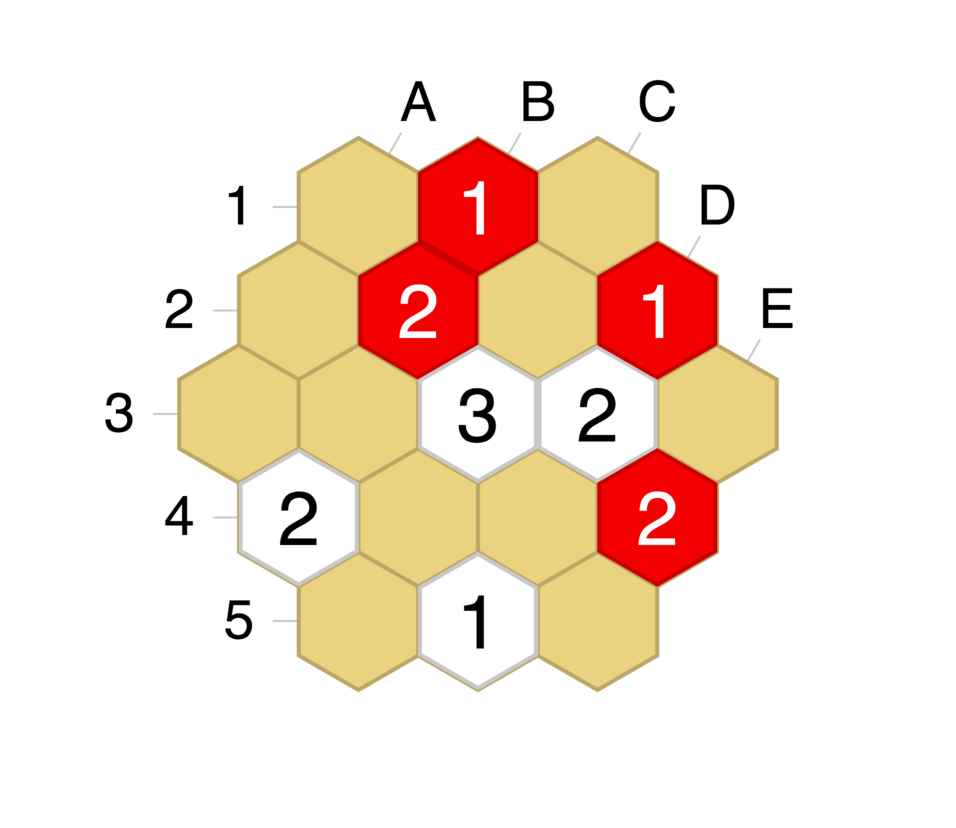
Puzzle 3: The key to answering this puzzle is knowing 3-stacks in the corner are always alive. The answer is 1. E3. Other options C1, D4, E5, and D3+ are all suicidal. The only move left is E3, and red will get 1 point of territory in the end. Keep this pattern in mind for future puzzles.
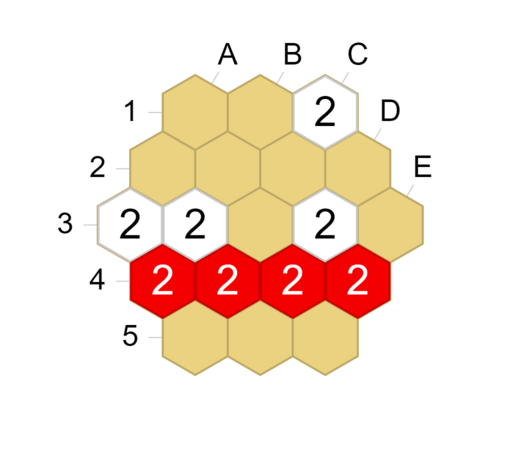
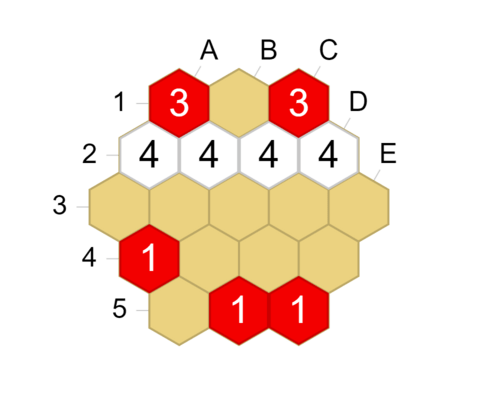
Puzzle 4: Red can’t play a board-spanning edge wall because White controls most corners. Red plays 1. F7 and if white plays … F5x then red can play F6 to live with 4 points.
Puzzle 5: red to live #
Author: shinuito Difficulty: easy

Puzzle 6: red to live #
Author: shinuito, adapted by spartacu5 Difficulty: easy
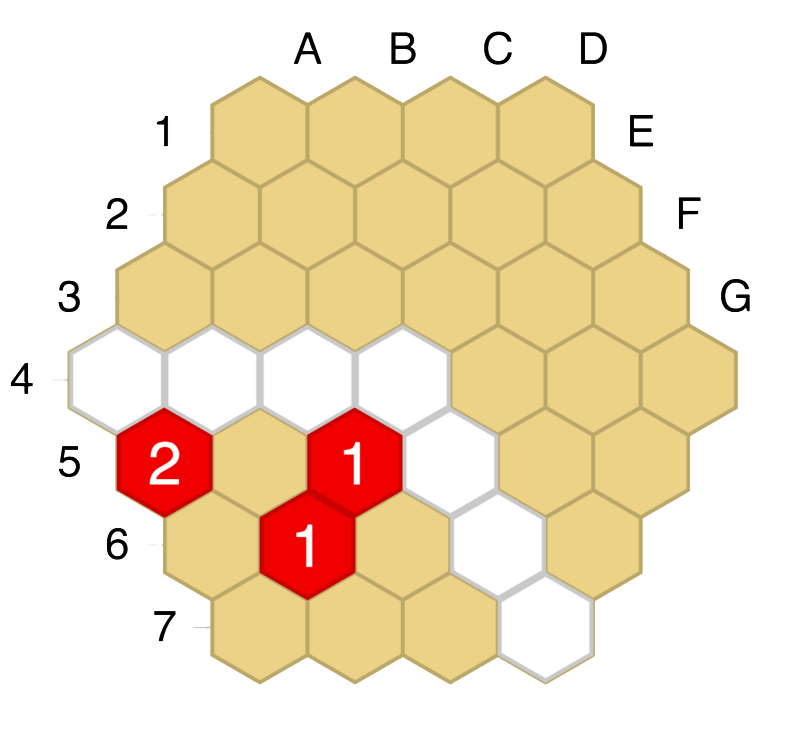
Puzzle 7: red to live #
Author: test654 Difficulty: easy

Puzzle 8: red to live #
Author: test654 Difficulty: medium
Solutions for Puzzle 5 to 8 #
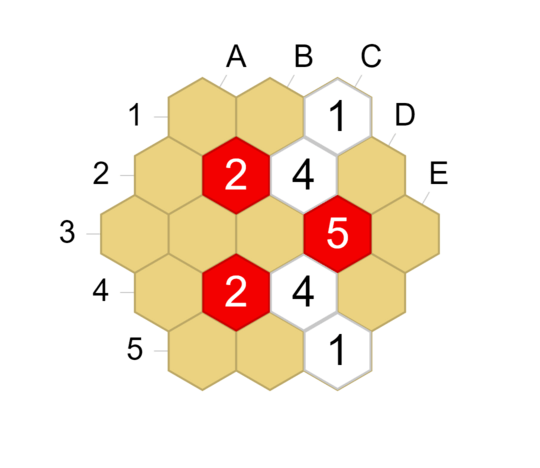
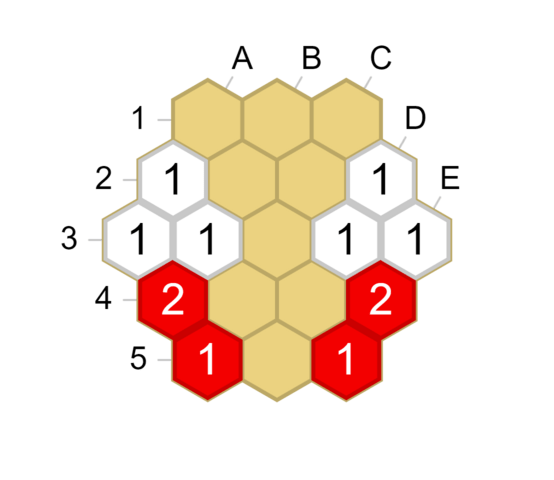
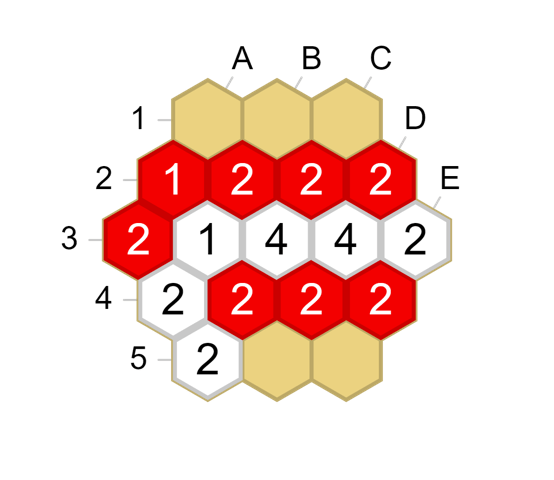
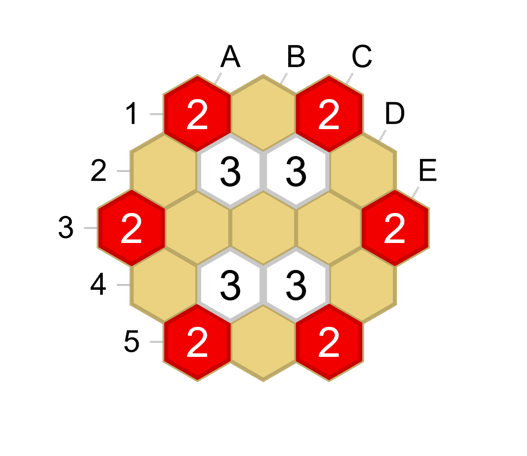
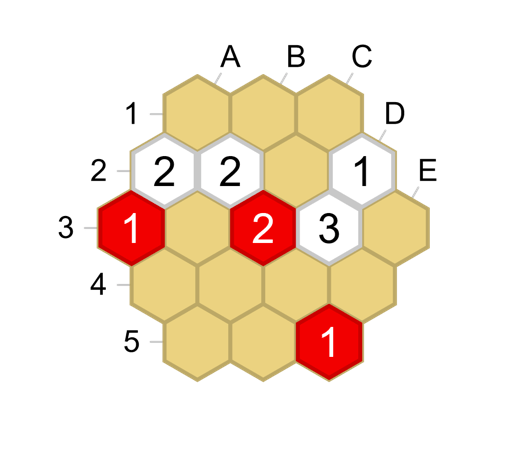
Puzzle 5: There are two solutions to this puzzle – red can play either B2 and C2.
Puzzle 6: 1. B3 is the shielding move, and red can survive with 5 points. All other moves allow white to play …C4x, after which the whole red side gets wiped out.
Puzzle 7: Red 1.F5 is the shielding move. After 1. F5 you have two threats: in case of White …G5, 2. F7 secures a corner 3-stack in G7 (which is alive), but in case of White …E6 or …F7, Red have also a second threat playing a 2-stack in G7, which parries any threat of capturing on F6, and later Red can reinforce with a 3 in G6. White cannot block both.
Puzzle 8: Red can get 2 points with 1.C5, which shields the 1-stack on D6 long enough to play a corner 2-stack on D7, which prepares enough fLOS to secure a capping 3-stack on C6. This puzzle was inspired by a tournament game between Florian Jamain and Alek Erickson played in round 3 of the Third Tumbleweed Open tournament in September 2021.
Puzzle 9: red to live #
Author: atari Difficulty: easy

Puzzle 10: red to live #
Author: atari Difficulty: easy

Puzzle 11: red to live #
Author: atari Difficulty: hard
Puzzle 12: red to live #
Author: atari Difficulty: hard
Solutions for Puzzle 9 to 12 #
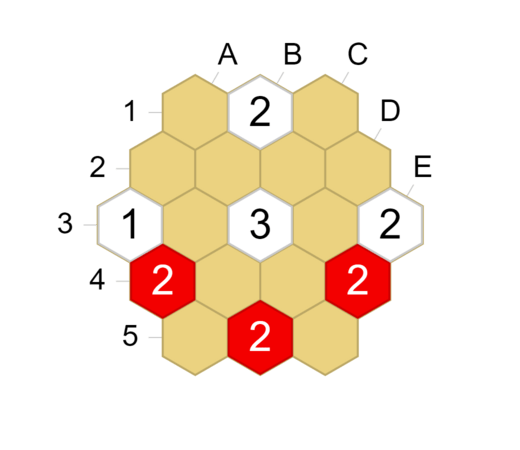
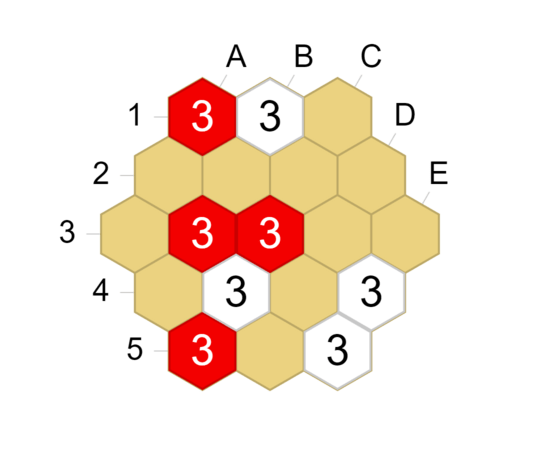
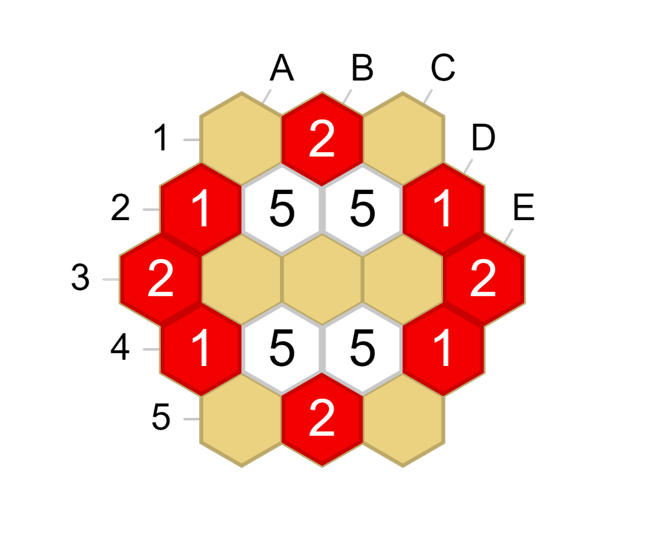
Puzzle 9: Red begins with 1. D4, after which it is not possible for White to prevent one of the two possible corner 3-stacks from coming into existence – either A1 or D1 will be Red life.
Puzzle 10: Red can live via 1.E7. If white captures …D5x, Red 2.D7 builds up another LOS in tempo while threatening to live with 4 points via C6. After White responds …C6, Red can reinforce 3.E7+ and red has a live 2-point corner group capped with a 3-stack on the edge.
Puzzle 11: 1.D6! Secures a small life for Red. White …C5, Red plays in the corner with 2.A4. To prevent a 3-stack edge cap, White captures…B4x but Red now can play 3.C6 threatening either B5 (3-point life) or D7 (2-point life).
Puzzle 12: Red 1.E7 threatens to create a board-spanning edge wall of 2-stacks (automatically alive) so White must respond by cutting with …F7. After this, Red 2.D6 creates a threat of a 3-stack cap on C6. After White responds by capturing …B5x, Red 3.C6 creates an unstoppable threat of reinforcing D6 to a 3-stack.
Puzzle 13: red to live #
Author: atari Difficulty: medium

Puzzle 14: red to win #
Author: atari Difficulty: very easy
Puzzle 15: red to win #
Author: atari Difficulty: very easy
Puzzle 16: red to win #
Author: atari Difficulty: very easy
Solutions for Puzzle 13 to 16 #
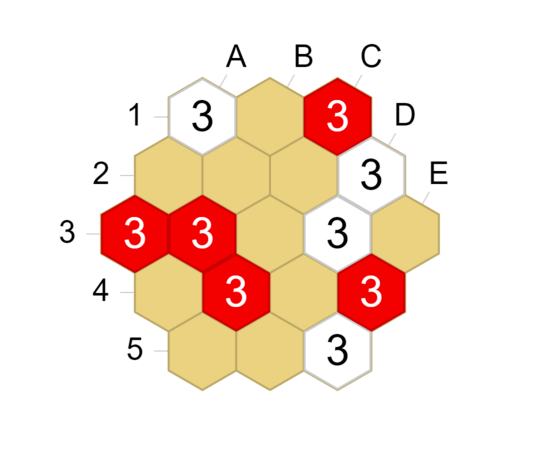
Puzzle 13: Red can ensure a 2-point group with 1.F7. After this move, no matter White’s response, Red can play 2.D7, and no matter White’s response, Red 3. E7.
Puzzle 14: This is the first introduction to Tumbleweed’s version of snapback, or delayed recapture. Red can play 1. b3 and after white captures …b2x then red responds 2. c2, and white cannot prevent the recapture of b2. If instead white plays 1… b1, red 2. a2x. In fact, 1. b3 is the only move. If instead red tries 1. c2, then white plays …b2x and red cannot try the same trick with 2. b3 as it would be suicidal in that position.
Puzzle 15. In order to control the coveted central hexagon, red has two options, a2 and b2. Here instead of playing in the important square, you win by building up lines of sight there to gain control. Directly occupying the center with 1. b2 allows white to play …c2, and after red’s only legal move 2. a2, white will capture …b2x with a 3-stack. Instead, Red should build up on the center via 1. a2, and after white …c2 then red will play 2. b2 with a safe 3-stack.
Puzzle 16: To win on size 3, one needs at least 10 points. White and Red both have safe territories – it is just a matter of who nabs the final point. To be clear, that final point lies on the only hotspot – the only contested hexagon B1. Occupying B1 directly with 1.B1 will fail to …C1 followed by 2.A1 and White …B1x and White wins. Therefore, Red needs to build up LOS first with 1.A1 and next turn Red can take the final point.
Puzzle 17: red to win #
Author: atari Difficulty: easy
Puzzle 18: red to win #
Author: test654 Difficulty: easy

Puzzle 19: red to win #
Author: atari Difficulty: easy

Puzzle 20: red to win #
Author: atari Difficulty: easy
Solutions for Puzzle 17 to 20 #
Puzzle 17. Red just needs to prevent any further reductions from White in order to secure the win. Let’s look at Red’s stacks to find the weak point, and bolster that. E4 is safe as long as C2 remains safe. C2 is safe as long as A2 and B2 remain safe. White invasions on the right at D2/D3 would be suicidal thanks to E1. However, A2 is a 1 stack with 1 eLOS and 1 fLOS. Further, the empty cell B2 is a hotspot with 2 LOS each. Allowing white to play there would make A2 fall. If red tries 1. B2, white …A3 will not give time to reinforce A2 and A2 will fall resulting in a white win. If instead 1. A1, red adds a line of sight to both A2 and B2, defending both cells. Then white …A3 will be met with A2+ and white cannot make further progress.
Puzzle 18. Red 1. C4 and white cannot make progress – Red will win with at least 10 points. (if White plays …A2, Red answers 2.B2)
Puzzle 19. All of Red’s invasions are suicidal, and moves like C1, C2, and B2 don’t add any new LOS, so the only rational choices are between A2 and A1x.Red can capture A1 directly, but White will forcibly capture B3. However, if Red plays on the hotspot 1. A2, Red oversees B3 while ensuring that A1 is captured.
Puzzle 20. White seems to have a double threat – …A1 or …C5 puts a red 2-stack under attack, and shielding with 2. C3 can be met by either white …B1 or …D5, and the 2-stack will not have enough fLOS to reinforce. However, red has the ingenious 1. A3, adding fLOS to both A1 and C5, preventing white from playing those cells. Red will win by 1 point. It is possible to defend multiple points from a distance by adding lines of sight.
Puzzle 21: red to win #
Author: atari Difficulty: easy
Puzzle 22: red to win #
Author: atari Difficulty: easy
Puzzle 23: red to win #
Author: atari Difficulty: easy
Puzzle 24: red to win #
Author: atari Difficulty: easy
Solutions for Puzzle 21 to 24 #
Puzzle 21: If red stays content in the lower side, white will close shop with more territory, so an invasion is necessary. A2 and D2 are the only Northern hotspots, everything else is controlled by white. If 1. D2, white …B2, red 2. D3 with the threat of capturing E3 fails to white … D2x. Red 1. A2 strikes at the weakness of White’s 1-stack on A3, which will be forcibly captured. If White tries a similar … C2, Red can simply capture A3 and later reinforce A2. Even if White tries 1…B3 then Red 2. A3x forcibly captures the 3-stack on B3 with 4 red LOS. Target the opponent’s weak point. Playing 1-stacks is safer if you can place them with a direct capture threat.
Puzzle 22. Red needs to capture the neutral and keep all his stacks safe to win. If Red begins with 1. B4, then white can oversee B3 by playing B2 which secures the neutral for White. If Red tries to capture the neutral with 1. E5, White can play …B4 and then red’s 1-stack on C4 will be in grave danger. The solution is 1. D4, which allows Red to oversee C4 via capturing the neutral, tipping the balance in favor of Red.
Puzzle 23. This will be split down the middle, and whoever gets majority along the midline wins. Among Red’s options, only 1. B4 seems to threaten anything. Red will eventually capture the 1-stack since White cannot reinforce it to a 3-stack quickly enough. Blunt angles need 3-stacks to live.
Puzzle 24. All of Red’s moves are either within Red’s own territory, or are suicidal moves, except for 1. B2, threatening the forcible capture of B3. After that, Red has an easy time winning.
Puzzle 25: red to win #
Author: atari Difficulty: easy

Puzzle 26: red to win #
Author: atari Difficulty: easy
Puzzle 27: red to win #
Author: test654 Difficulty: easy
Puzzle 28: red to win #
Author: test654 Difficulty: easy

Solutions for Puzzle 25 to 28 #
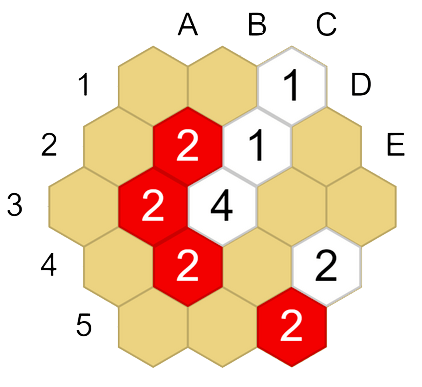
Puzzle 25. Red needs to seize the opportunity to invade with 1. C5, threatening to help the Red 2-stack on E4 by permitting a 2-stack to be played on E5 later. 1.C5 is also a threat to begin apple-picking with C3, after which B3 and A3 would die. So if White responds with 1…C3, Red plays 2. E5, and if instead White responds by 1…D5, Red plays C3 and begins apple-picking. Notice how Red’s attempts to invade with 1. E5 directly don’t work at all. After 1…D5, 2.C5 is suicidal for Red. Make your invasions while you can!
Puzzle 26. White is threatening to capture both B3 and D3 because White has 2 LOS on both of those Red 1-stacks. However, Red can parry both with 1. D5! Making the captures suicidal. If White builds up then Red can simply reinforce. Notice that attempting the same maneuver with 1. B1 fails to cuts on B2 and C2.
Puzzle 27. Though 1. E4 looks promising, it falls to White … E5 and Red won’t be able to reinforce in time, leading to a 1-point loss. Better is 1. E3 which secures both D3 and E4, the necessary points to eke out a victory. After White protests with …E5, this time Red soundly closes up shop with 2. E4.
Puzzle 28: On 3x3, a player only needs 10 points to win. In this position, Red’s board-spanning wall of 2-stacks ensures 7 points, so only 3 more are needed for a win. 1. E5 secures these extra points, and white cannot cut in time: …D2 is met by 2. D5 and the 1-stack on C5 will be safe.
Puzzle 29: red to win #
Author: atari Difficulty: medium/easy
Puzzle 30: red to win #
Author: test654 Difficulty: medium
Puzzle 31: red to win #
Author: atari Difficulty: medium
Puzzle 32: red to win #
Author: test654 Difficulty: medium
Solutions for Puzzle 29 to 32 #
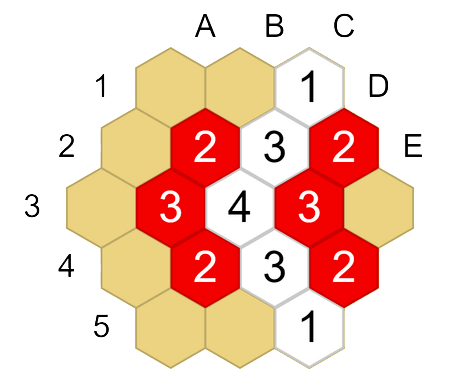
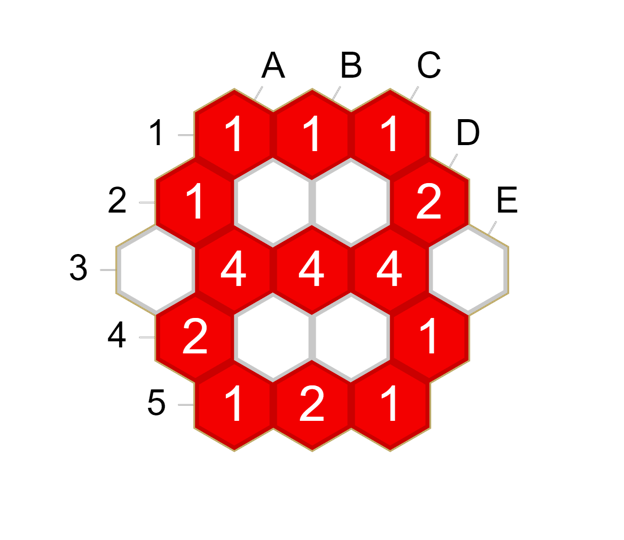
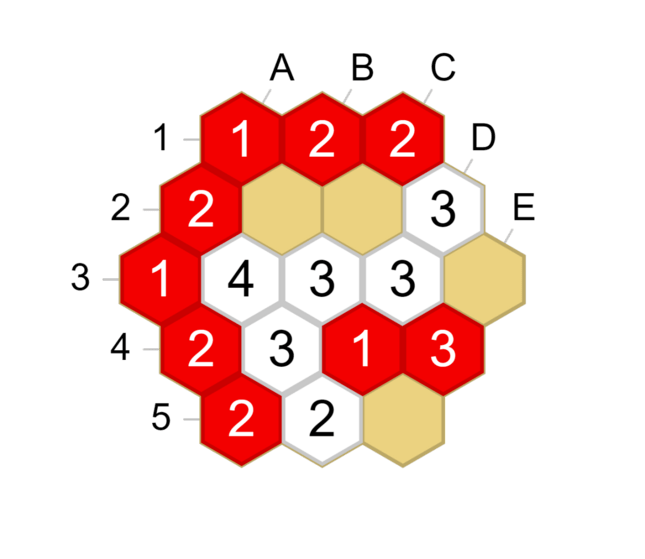
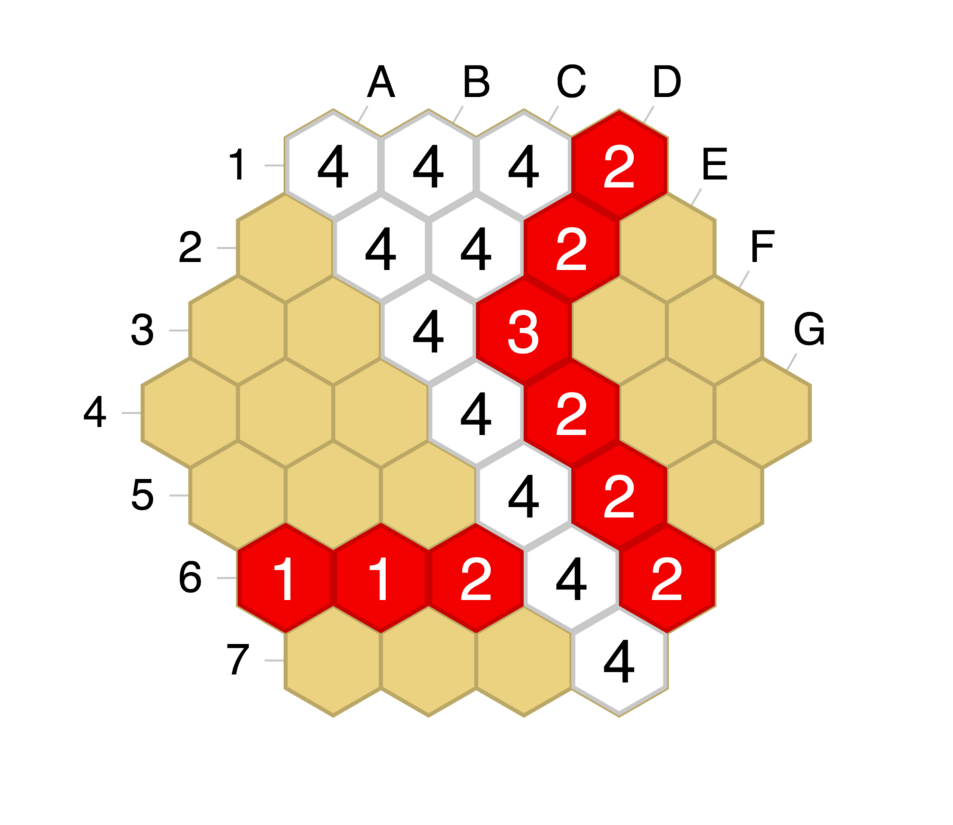
Puzzle 29. In a position like this, Red must focus on the outline of Red’s shape, and specifically the weakest points in it. Here, that is C2, B3, and D4. The upper right has 1 point guaranteed for Red, the left side has 2 points guaranteed for Red, and the lower right has 3 points guaranteed for Red. Since the groups are all equal in size (4), that means the less points guaranteed for Red, the higher priority the group is to reinforce. 1. C2 + and White can do no better than …B3x, and Red can secure the win with 2. D4+.
Puzzle 30. The only move that curbs White’s expansion is Red 1. C1 – although it is a 1-stack with already an eLOS, attempts to threaten it (e.g. …A1) are met by further expansion by Red with the strong Red 2-stack 2. B1. Note that if Red tried 1. B1 directly, White would have an easy time capturing it. One might think playing on the north side with 1. C1 is ignoring a scary cut by White on the hotspot …D4, but it is a snapback. Red can simply punish via 2. E4, and the empty threat with White …C5 is met with Red 3. D4x. Check whether you really need to defend before you waste a move in your own territory. Extend measuredly.
Puzzle 31. The ambitious Red 1.E3 is smashed asunder when white captures …E4x, marking the beginning of the end for the lower Red group. The lower Red group must therefore be properly capped with 1. E5+. Now, if White captures …E4x, Red simply extends with B3, winning by a point. If instead, White tries to deprive Red of the extension by playing 1….B2, sparing E4 momentarily, now Red plays E3, threatening to reinforce E4. After white captures …E4x, Red can play B3 to capture B2 in a snapback. Know when to defend. Don’t overextend.
Puzzle 32: Red protects the 1-stack on A1 by playing 1. A2. If White …B4, Red defends with 2.B3 or B2. If White attempts to surround Red with …E5, then 3.D5, forcibly capturing both C5 and E5.The move order here doesn’t matter, for each white move, Red has a clear response. Even though it is painful to play in what feels like your own territory, some stacks are necessary to defend!
Puzzle 33: red to win #
Author: test654 Difficulty: medium
Puzzle 34: red to win #
Author: test654 Difficulty: medium

Puzzle 35: red to win #
Author: atari Difficulty: medium
Puzzle 36: red to win #
Author: test654 Difficulty: medium

Solutions for Puzzle 33 to 36 #
Puzzle 33: Red makes a double attack with 1. C3, putting 2 LOS on both B3 and D3. White responds with a double parry on …B1, but to White’s chagrin, Red has yet another double attack 2.D5! This time, because both targets have 3 eLOS, it is not enough to parry. White can reinforce one (e.g. …B3+) but not the other. Red can capture 3. D3x and E3 will fall, leaving Red with the majority. If instead, Red tries 1. C1 white swiftly defends with …C2.
Puzzle 34: With 5 spots left on the perimeter and Red to play, Red can win by avoiding captures. On the other hand, White wants to create a double attack to trap at least 1 Red stack to shift the material balance. If Red passes, for instance, White can play …B1 threatening either to trap A1 or C1 via the follow-ups A2 or D2. If Red plays a move like A2 or B4, White can still play a similar tactic targeting C1 and E3. However, Red 1. B1 creates a board-spanning wall of 2s, defending both A1 and C1 at the same time, and makes the defense of A3/E3 simple. Some moves can arrange your weaknesses such that they magically disappear.
Puzzle 35: A two-step anchor is the key to this problem. Two sequential sacrifices, to build up LOS on a key point. The first anchor is … 1.C1 the only winning move. White can immediately cut the invasion off with …C2 but that allows: A second anchor! 2.D2, threatening C2x, forcing White …C1x. Finally, red gets a chance to secure the bottom and trap C4 with 3. D5. Just enough to win.
Puzzle 36: If Red plays 1. D2, then 7 points in the North are guaranteed. However, since White …D5x, would demolish Red’s South side, Red must first play in the South. Also note that if White plays first in the North, only D2 is available, after which Red can respond with C2 and take 6 points there. Since both C5 and D5 are under attack, the move 1. C4 is worth considering – a double shield, which makes D4 and E4 under red control. White can respond by …B4, trapping C4, but there is not enough time: Red 2.D4 threatens to next reinforce C4 (taking 5 points) or play E4 (taking 4 points), both of which are enough to win after White cleans up the bottom left and starts first on top.
Puzzle 37: red to win #
Author: atari Difficulty: medium
Puzzle 38: red to win #
Author: atari Difficulty: medium

Puzzle 39: red to win #
Author: atari Difficulty: medium
Puzzle 40: red to win #
Author: test654 Difficulty: medium
Solutions for Puzzle 37 to 40 #
Puzzle 37: Here it is worth noting how Red’s stack on C1 is unconditionally alive, but E4 could be killed if White gets to play D4-E3. But you should protect your pieces. Red can cut White’s link between A1-E5 by playing C3, controlling D4. After this move, White can no longer harm E4, and then it is surprisingly difficult for Red to lose. After Red 1. C3 White …A2, virtually any move for Red keeps the win. If at any point White adds an extra LOS to D4 with …D5, Red simply occupies D4 and clinches the game after capturing D5 later.
Puzzle 38: Red has 3 options – B1, D3, and D4. Let’s consider all three options, especially in relation to White’s not-quite-safe stack on E4. After 1. B1, White …C2 is winning for White. Red would have 1 option thereafter, 2. D4, which is soundly smashed with White …C4. In that variation, E4 becomes safe because the key access points D3 and E3 are controlled by White. In a second variation, If Red immediately tries 1. D4, White can directly occupy the key access point …D3. Now, even after 2.B1, White …C2 defends against the capture and Red 3. B4 White …B3 gives White too many points. Red needs to begin by occupying the key point: 1. D3 and suddenly it is not so easy for White to prevent red from taking over 10 points on the East side. B1 is not seen by White, D4 is controlled by Red, and the concave corner on D3 makes Red’s shape very stable.
Puzzle 39: Red can claim the entire West side with 1. A1 followed by 2. B1. Instead attempting to extend further with 1. B1 leaves red vulnerable to White …C1. Order your moves such that you put your stronger pieces outward. In Tumbleweed, an exoskeleton is oftentimes more useful than an endoskeleton.
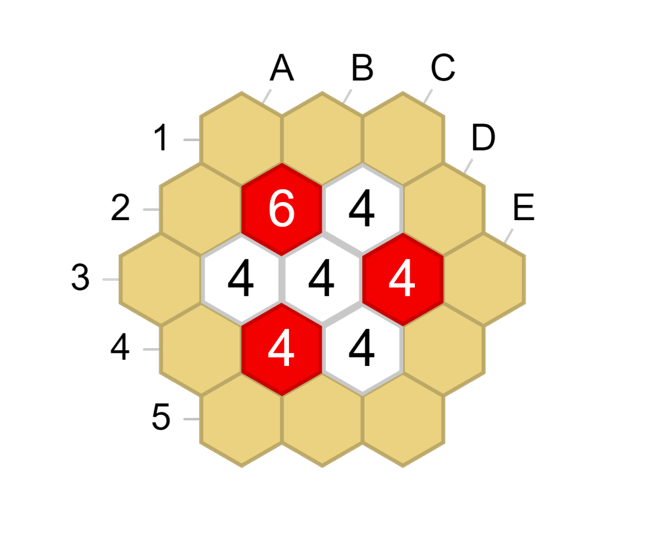
Puzzle 40: In this position, It is good shape to play in the corner, and adjacent to the weaker stacks. Not 1.A1? After White surrounds one of Red’s 4-stacks with …C1 and later …E5, the 4-stack and the game is lost, but Red’s 6-stack is invulnerable, so there is no need to protect it. Instead, Red can start with 1. C5 (E3 is identical). After White plays …C1, Red 2. C5, White …A3, and both players share the two remaining hotspots on D2 and B4, Red can curl around and eventually capture D4 to get the final point, while White watches in horror.
Puzzle 41: red to win #
Author: atari Difficulty: medium
Puzzle 42: red to win #
Author: atari Difficulty: medium
Puzzle 43: red to win #
Author: atari Difficulty: medium
Puzzle 44: red to win #
Author: atari Difficulty: medium
Solutions for Puzzle 41 to 44 #
Puzzle 41: First, notice that Red is guaranteed 4 points on the right side, so 6 points is needed in the left. If Red plays along the entire left side and B3 survives, it will be enough. Red can play 1. A3 and after that, both cells A1 and C5 are controlled by Red. White can play B1 or D5 to capture B2 and C4, but these attempts aren’t enough to stop Red from claiming the necessary 6 points on the left.
Puzzle 42: If White plays first, White can forcibly capture B2 via B1 or A1. Thus, it is important to squeeze the last potential from this stack if possible. Though it looks unnatural to play in what ostensibly could be called Red territory, the solution is 1. A2. This ensures that when Red later plays A1, it will be a 2-stack in the corner and therefore safe after the demise of B2 and inevitable control of B1 by White. If Red thinks 1. A3 could also work, think again. After White…B2, Red 2.A1, White can play the tricky …D3, and then Red is one step behind when it comes time to reinforce.
Puzzle 43: It may look attractive to play 1.E3, nabbing an extra point while threatening D3, but after White …C2x the situation is not good for Red, due to a severe follow-up: Red defends 2.B3x and White keeps attacking with …B1, trapping B2 (and B3 by association). Instead, Red should gain a head start in the fight to come: 1.B3! Turns White …C2x into a snapback via 2. B1. If White then captures …E4x, please don’t make the mistake of thinking capturing C2 and B4 are equivalent! 3. C2x is answered by White …B4+ and a White win. Red needs to capture 3. B4x and let the 2-stack on C2 squirm for an extra turn.
Puzzle 44: Red is tempted to capture 1. D3x but after White responds …A2 the Red 2-stack on B2 will fall. Occupying 1. A2 as a preventative measure will fail to White …A3, so instead Red can play the controlling move 1.A1. Notice how White cannot play any shielding, parrying, or capturing moves to protect D3. The best White can invent is …E5 which is easily answered by 2. D3x
Puzzle 45: red to win #
Author: atari Difficulty: hard
Puzzle 46: red to win #
Author: test654 Difficulty: hard
Puzzle 47: red to win #
Author: test654 Difficulty: hard
Puzzle 48: red to win #
Author: test654 Difficulty: hard
Solutions for Puzzle 45 to 48 #
Puzzle 45: Red can temporarily increase the red LOS on the lower side, while blocking White’s attack on the 1-stack on D5, by playing B3! This move is an anchor. Not meant to live forever, but just giving Red enough stability to gain a winning position. White can strongly attack B3 by playing …C3, but it is too late: 2.A3! Now, after White captures …B3x, red can play 3.D4 and secure the lower side. Now, White can nab an extra point by playing on …B1 but it is not enough. Red wins by one point.
Puzzle 46: Red can try to capture 1. B3x, but after white responds … C4x, red’s lower right will die, and the 9-point North side is not enough. Instead, the brilliant 1.D5! Allows red to make an extra point in tempo. White will need to respond …C4x, but this time after 2. E5, white must capture …D4x to prevent a 4-point territory forming there, after which Red can consolidate with 3. B3x.
Puzzle 47: Red 1. D5! This move looks bad, but is the only way to win: It temporarily adds lines of sight to otherwise vulnerable stacks which will end up being the outline of Red’s territory. After White …C4 Red 2. A3! And after white captures …B3x then red can now solidify with 3.E3, and the anchor at D5 is no longer needed.
Puzzle 48: Due to symmetry there are only 3 real options here – B1, A2, and B3. This puzzle is simply too hard to describe the solution, but Red’s only winning move is 1. B3. after red b3: Other than the e4-d2-d5 line you can play on the edge and keep your corner stones alive and always win with that. When it only gets you 9 points white will need 5 moves to get the other 3 edge points so you will get one of them before white after your 3 moves. d3 d2 (b3x b4) (e4 d3x any e4x) (c3 b4) (b1 d3x any b4) (d5 d3x any b4) c3 d2 (b3x b4) (d3 b4) (b1 b4) (e4 d5) (d5 e4) d5 e4 (c3 a2) (b1 d2) (d2 b1) e4 d2 (c3 d5) (d3 d5) (b1 d5) (d5 d3! (b1 e4x) (c3 e4x) (e5x b1 c3 c2x)) d5 e3 is a fancy alternative.
Puzzle 49: red to win #
Author: test654 Difficulty: hard

Puzzle 50: red to win #
Author: test654 and atari
Puzzle 51: red to win #
Author: test654

Puzzle 52: red to win #
Author: test654
Solutions for Puzzle 49 to 52 #
Puzzle 49: Red cannot add lines of sight to D3 because of strong control by White, but Red can directly occupy: 1.D3! Then, White …B2 (or C2, C4, D4, they are all the same thanks to symmetry). If Red tries claiming the opposite side with a wing via 2. E4 or similar, White …D2 threatens to capture D3. It is not a snapback because after Red 3. A2, White …D3 (threatening C3x), then Red 4. B3x, White can play …D4, winning. For each of Red’s possible second moves on the 4th line, White has a similar winning variation. Thus, Red responds to each White move locally: Red 2.A2, if White follows up with …C4 then Red 3. E4 (not again 3. B4?? White … E4 is too strong).
Puzzle 50: Due to symmetry Red has 2 options – A1 or B3. Let’s consider both. After 1.A1, White can begin capturing via …D2, and wherever Red plays, White can dodge across the board and capture another stack on the other side – this will be too many captures, and White would win. Instead, B3 is the good shape move. In Red’s ideal world, Red starts with 1.B3, and after White …C3, Red 2.D3 clinches the game. But White has better responses. After 1.B3 D2x, Red can try to salvage the East with D3, and although it is a snapback, it gives Red enough time to reinforce E4 after playing all the moves to connect a long snaking group around the perimeter.
Puzzle 51: The key to this puzzle is recognizing that even though White has moves in the North, they are all weak 1-stacks that will get squashed by Red B1. So red can focus on the important issue of not letting white get either B3 or D3. Like previous puzzles in which occupying was weaker than seeing, here is an example of that, multiplied by two: 1. C3! By Red instantly controls B3 and D3, giving Red the time to occupy at Red’s convenience. The rest of the moves are trivial to find: simply respond to White locally.
Puzzle 52: Red must reinforce with 1.B1+ and after White …A2x, Red can choose the next most valuable point 2. E4+. White will continue to capture with …A1x but after 3. C1+ Red has enough.
Puzzle 53: red to win #
Author: test654
Puzzle 54: red to win #
Author: test654 Difficulty: hard

Puzzle 55: red to win #
Author: test654 Difficulty: medium
Puzzle 56: red to win #
Author: test654 Difficulty: medium

Solutions for Puzzle 53 to 56 #
Puzzle 53: Due to symmetry Red has 3 options to reinforce (A1, B1, and B2), but of these, the only ”good shape” move is 1. B2+ (3-stack on a blunt edge is alive). If White captures a different one (for instance …C4) then Red again reinforces on the next blunt edge 2. D3+. White will capture one of the edge 1-stacks, but at this point Red can secure a 10 point territory in the next two moves by reinforcing E5 and A2.
Puzzle 54: Here is a puzzle that shows how in Tumbleweed, what appears to be a double attack can actually help the opponent fix their position, while a seemingly quiet move can facilitate a cruel double attack. After Red’s attempt at a double attack 1.B4 looking at both B2 and an eventual takeover of E4 via E5, White shuts down the whole operation with …B2 prompting a shield and giving White time to protect E4 via E3. Instead, the magical Red move 1. E5! And White is helpless, despite the illusory invasion …C4. Red simply responds by 2.D4 and even the scary-looking White …B3 is going nowhere after Red 3. C4x.
Puzzle 55: 1. C4 makes all white encroachment suicidal, allows red to reinforce C3 when white challenges it with …C2 or …C1, and builds up on the crucial E4.
Puzzle 56: Red captures with 1. C5x and White may protect the hotspot A2 with …A1, after which Red plays C4 which makes E4 and A2 equivalent. If at any time, White pesters C3 with …C2, Red can simply respond with C3+.
Puzzle 57: red to win #
Author: test654 Difficulty: medium

Puzzle 58: red to win #
Author: test654 Difficulty: medium
Puzzle 59: red to win #
Author: test654 Difficulty: medium

Puzzle 60: red to win #
Author: test654 Difficulty: medium

Solutions for Puzzle 57 to 60 #
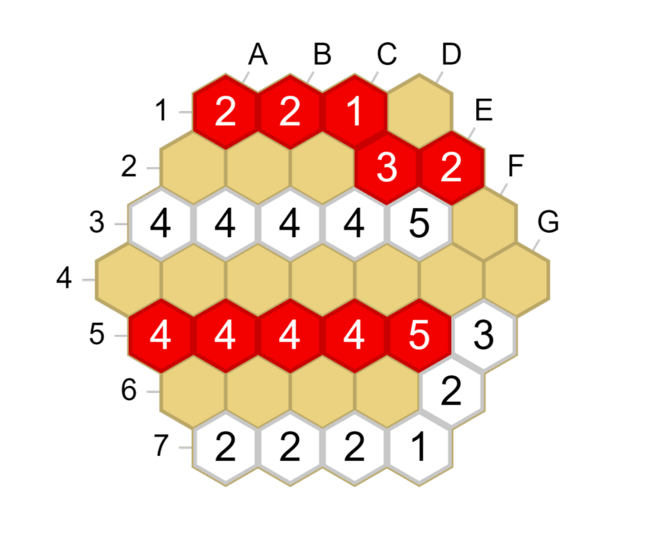
Puzzle 57: Red must choose between extending his relatively safe territory on the northwest, versus living on the southeast. Currently, Red controls 8 points in the northwest, thanks in part to Red’s safe shape with a 3-stack on C2. Thus 2 more points are needed to win. Playing 1. B4 will increase Red’s control by 1, but then White …D4x and E4 cannot persist. If a 3-stack is to live on the edge, it need to either be placed in the corner, or cap a line of 2-stacks leading to a corner (or leading to another 3-stack cap). So Red’s first move must help out E4 with 1.E5! And the 2 point life is secured. After White …B4 Red can play 2.B3 and the game is over.
Puzzle 58: This puzzle one must recognize that the line of Red stacks along the perimeter is safe! This is 7 points already, and Red needs to make 3 more to win. Red could try to extend immediately with 1. C2? But that fails to White …D4x and E4 will fall. However, Red can live in tempo with 1. E5! Threatening to capture D5. This forces a White response …D4x and Red can safely extend with C2, winning. Always look for ways to keep the initiative via forcing moves.
Puzzle 59: Attempting to surround White with Red 1. D2? Looks attractive, but after …D4x, and no matter what Red responds, white will capture D2 and win. Surprisingly, the solution is another move which can be captured almost immediately: 1.D3! And now if White …D4x, Red 2.E3, White …D3x, after which Red 3. C1 wins. If Instead White delays capture after Red 1.D3 with …D2, Red nonetheless plays 2.E3, and after White …D3x, Red can still win with the extra LOS that was spared: 3. E5.
Puzzle 60: Claiming a hotspot with Red 1. D3 isn’t enough for Red to win – after White …A3, Red only gets 9 points to White’s 10. But both A3 and B4 are suicidal, leaving the only option as 1. B3. White could forcibly capture B3 via …B4, but after Red 2. A3, the threat of reinforcing B3 and the threat of claiming D3 are equivalent – no matter what White chooses from here, Red’s strategy of playing in tempo secured the extra point needed to win.
Puzzle 61: red to win #
Author: atari
Puzzle 62: red to win #
Author: test654
Solutions for Puzzle 61 and 62 #
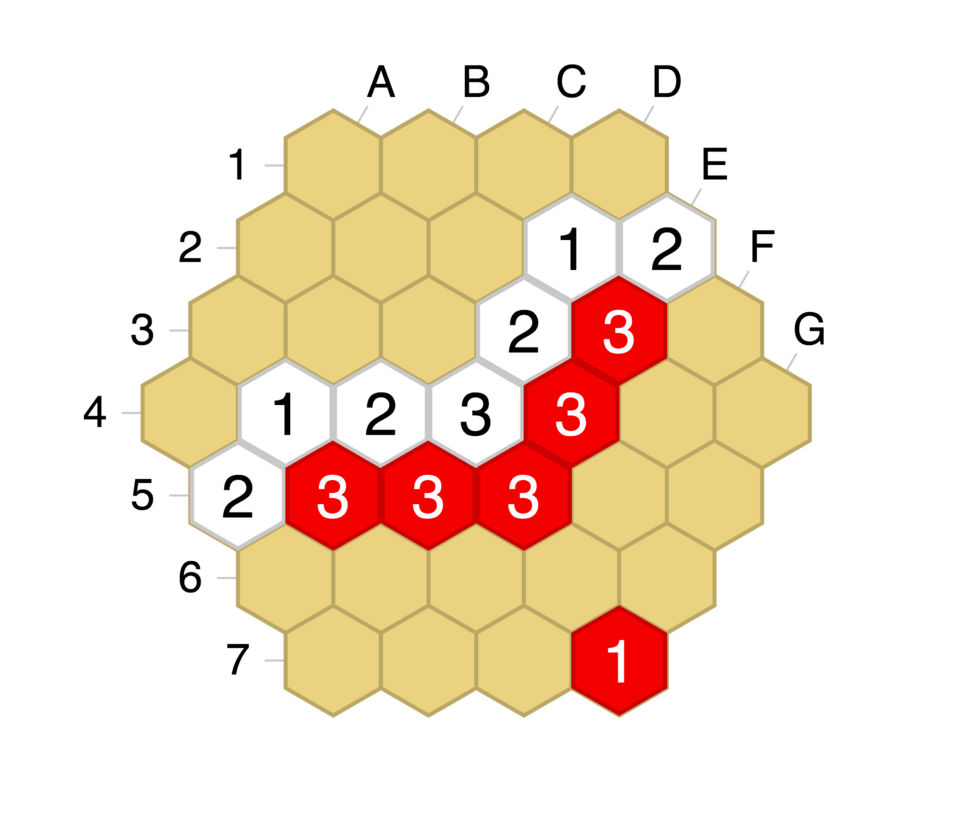
Puzzle 61: Red needs to prevent white invasions in order to win. If Red F3, then White C6 and so on. The only way to guard both sides at once is from a distance – 1. F6. Now all White invasions become suicidal and Red will have enough points to win.
Puzzle 62: No solution yet. If 1.G7, …C6 traps C5 and that will secure enough points for White to win. Instead, Red must play 1. F6. Now, White has one invasion option - …D7. If Red tries 2.G7, again White can play …C6 trapping C5. So Red must take 2.C6, allowing White to come in on the other side with …G4. Again, Red defends via 3. F3, allowing White to link up on …G7. However, the invasion is futile, since White will not be able to make any double attacks, or 3-stack caps on the edge, or board-spanning walls of 2-stacks on the edge. So, after 3.D7x G5 4. F4 the White invasion will slowly be eaten.
Puzzle 63: red to win #
Author: test654
Puzzle 64: red to win #
Author: atari
Solutions for Puzzle 63 and 64 #
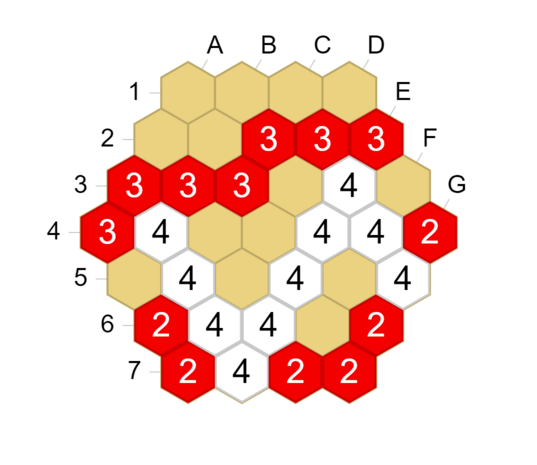
Puzzle 63. On size 4 you need 19 points to win and Red already has secured 12 on the right, so Red needs to live with 7 more points on the left side. 1. C4 (1. C5 {loses} 1… A4 {E6 can’t be defended}) (1. D5 {loses} 1… C4 {F7 also defends} 2. B5 D5x 3. B4 (3. E7 B4) 3… E6x 4. D7 A3 5. A4 B4x 6. C5 E7) 1… B3 (1… A2 {same as B3}) (1… B5 2. D5 (2. C5 B4 3. E7 C4x 4. D5) 2… B4 3. E7 C4x 4. C5) 2. A4 C4x 3. A3 E6x 4. D7 E7 5. C5 (5. D6+ {loses} 5… B5)
Puzzle 64. This puzzle test your ability to see the value of moves in the endgame. Always play the biggest moves you can find! F6 is worth 4 points. B5 is worth 3 points, F3 is worth 2 points, and D3 is worth a single point. Here we can see the Go proverb clearly laid out in puzzle form – “your opponent’s biggest move is yours”.
Puzzle 65: red to win #
Author: atari

Puzzle 66: red to win #
Author: test654
Solutions for Puzzle 65 and 66 #
Puzzle 65: This puzzle is another “value assessment” themed position about how an extra LOS along a friendly wall can help a player mop up tons of points in endgame. Stacks that see along friendly walls are called ”wings”, And you want to control both wings along the longest possible walls. Knowing this, you can see how 1.E4 is the biggest point for Red. Once White takes the next-biggest extension with …F6, Red plays 2. B2.
Puzzle 66: Red 1.A4 sets up wings along Red’s wall until E4. It can be answered by White …F4 but Red can then claim the points with 2. E4. White will get to claim the smaller Southern wing with …C6, but after Red claims the final (smallest) wing in the North with 3. A2 the game is decided in Red’s favor. If White instead ignores 1.A4 by playing …A2, Red 2.F4 dominates the whole center and wins.
Puzzle 67: red to win #
Author: test654 Difficulty: hard

Solutions for Puzzle 67 #
Puzzle 67: This is a great example of how a sacrificial move that initially looks pointless can buy enough time to win. Solving this one puts all your puzzle practice to the test. The first line of thought goes something like this: “There are 2 disputed areas worth 3 points each (H4 and A3), 2 disputed areas worth 1 point each (D8 and E5), 1 point that looks disputed which is controlled by white really (A2), 1 point that looks controlled by white which will become disputed after red plays D8 (E8), and a 5-point area which will, by estimation, at best produce 1 point in the corner for Red. Let’s say Red plays first trying to save the group. First there are only 2 legal moves in that area - H9 and I9. H9 threatens to reinforce H8 to a 3-stack and threatens a 3-stack in the corner for permanent 1-point life. But White can always capture G8 and Red’s formation dies. Red can play for small life at I9 but white can still capture H8 and afterwards I8 and H9 fall, making the lower right very small for Red to play first in. So Red should start at the first big points - A3 and H4 (White can take the other). Then red can try to get a point out of the lower right, in tempo, but that leads to 30-31 in favor of White.”
However, this misses Red 1. A2! with the threat of 2. B2! The extra line of sight from this anchoring move allows Red to take more points elsewhere while still controlling the big moves on the upper left. Zapawa notes: “The best lines for both players appears to be: 1. A2 G3 2. H9 G8x 3. I9 H8x 4. B2 D8 5. E5, or 1. A2 G3 2. B2 D8 3. H9 G8x 4. I9 H8x 5. E5, both resulting in the same charming spread.” This puzzle is a monster, but the solution is perfectly logical and builds on all the previous concepts that can be found in this puzzle handbook.
Puzzle 68: red to win #
Author: test654

Puzzle 69: red to win #
Author: test654

Solutions for Puzzle 68 and 69 #
Puzzle 68-69: These two puzzles are to demonstrate how mirroring can sometimes work in Tumbleweed, given very specific conditions. This should be enough reason not to offer symmetrical pies.